Working with branches
Overview
In the following episode, we introduce the concept of branches and how you work with them on the basis of the feature branch workflow.
Tips for instructors
- Please explain briefly the main aspects of the branching concept and the feature branch workflow but do not get lost in details.
- You can use a drawing of the version history to explain these concepts. In addition, you can use it to show the current progress in the episode.
Checkpoints:
- Please make sure that all participants are on the
mainbranch before you start with the feature branch workflow. - Please make sure that all participants could finish the current main step when demonstrating the feature branch workflow before switching to the next one. Otherwise they could miss a detail and might be unable to create the conflict situation.
A branch is a specific series of commits in the repository:
- Right now, we only have one branch named
mainwhich contains all our commits and starts from the root commit. - You can create a new branch starting from any commit and refer to it with a specific name.
For example, you could create a new branch named
newfrom our last commit on the main branch. - You can decide on which branch you add a commit by switching to this branch.
For example, you could switch to the branch
new. Afterwards, all new commits are associated with thenewbranch. You have to explicitly switch to themainbranch to add commits there again. - You can integrate the changes of a branch into another branch by merging these branches.
For example, you could decide to merge back all our changes on the
newbranch to themainbranch. Afterwards, the commits of thenewbranch are also part of themainbranch’s history.
Branching is a general concept of version controls systems such as Git. There are different reasons to use branches, for example, working in isolation on a specific task. Patterns such as the feature branch workflow provide guidance on how to use branches in a meaningful way.
The main ideas of the feature branch workflow are:
- There is only one long-living branch (main branch) which reflects the current reference version (“truth”) of the repository.
- The main branch acts as a synchronization point for starting new work and integrating finished work.
- The actual work is performed on so called feature branches. Once the work is considered finished and stable, the changes are integrated back into the main branch.
- Feature branches exist only temporary and are short-lived. You do not reuse them to perform new work. Instead you create a new feature branch.
The feature branch workflow is used quite often in context of Git. It also provides the basis for features of code collaboration platforms such as “merge requests” (GitLab) and “pull request” (GitHub).
Working with the feature branch workflow
In the following, we contribute more information about the Mummy concerning Mars by using the feature branch workflow. There are a couple of things which we want to prepare before we start.
- Check that you are in the right place:
pwd- Should indicate that you are in theplanetsdirectory.git status- Should indicate that your repository does not contain any modifications.
- Rename your branch to
mainif needed:- If the output of
git statusstarts withOn branch master, you need change the branch name as follows:git branch -m master main- Manually renames your branch frommastertomain.git status- Should now indicate that you areOn branch main.
- If the output of
- Configure some useful details:
git config --global alias.graph "log --oneline --graph --all --decorate"- Configures a new Git commandgit graphwhich you can use to see a comprehensive summary of the version history of your repository across all branches.git config --global commit.verbose true- Configures Git to show the changes of a commit when Git launches the editor on committing time.
Now we are ready to start!
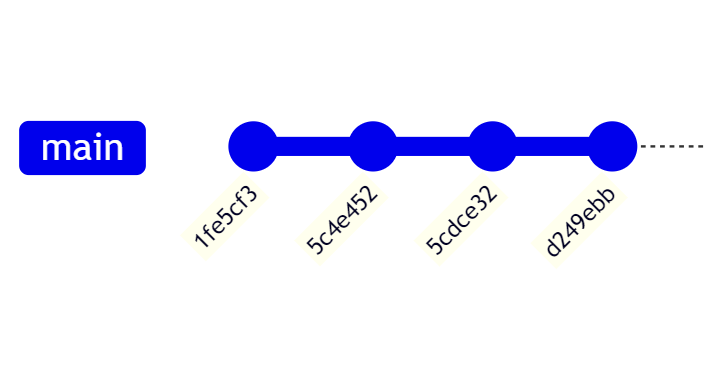
git graph should indicate a version history similar to the following figure:

Set up the feature branch
We create a new branch named mummy-info:
git branch- Shows all existing branches. Currently, there is only themainbranch.git branch mummy-info- Creates a new branch namedmummy-infostarting from the last commit.
We have created our feature branch but we still have to switch to it:
git switch mummy-info- Switches to the new branchmummy-info.git status- Indicates that you are nowOn branch mummy-info.
Now, we are ready to start working on our actual task.
Tips for switching branches
- You can create a new branch and directly switch to it via
git switch -c <branch name>. - Older Git versions use
git checkout <branch name>to switch branches. It still works with recent Git versions but we recommend to use the new command instead.
How do I know on which branch I am?
There are several options:
git status- Indicates that you areOn branch <branch name>.git branch- Uses the*character to indicate on which branch you are.git graph- UsesHEAD -> <branch name>to indicate on which branch you are.- Your shell prompt configuration might be configured in a way that it shows on which branch you are.
Perform the work on the feature branch
We perform two commits on the feature branch:
- Edit the file
mars.txtand commit the changes:- Add the following line:
Mummy will appreciate sand storms on Mars - Please make sure that you added a closing blank line and saved the file properly.
git add mars.txt- Add the changes to the staging area.git commit -m "Add advantages for the Mummy"- Records the change in the version history. The command output indicates that you performed the commit on branchmummy-info.
- Add the following line:
- Edit the file
mars.txtand commit the changes:- Adapt the first line and attach at its end:
(for Dracula) git add mars.txt- Add the changes to the staging area.git commit -m "Concretize the first fact"- Records the change in the version history.
- Adapt the first line and attach at its end:
We are done with our task.
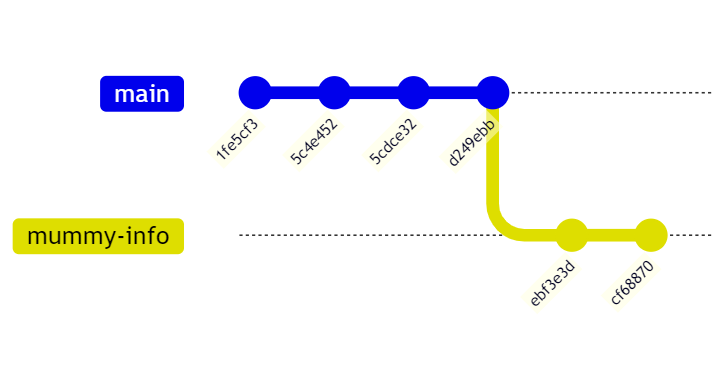
Afterwards, git graph should indicate a version history similar to the following figure:

Simulate ongoing work on the main branch
Imagine that someone else changed mars.txt and integrated the changes back to main.
We perform this change directly on main for demonstration purposes.
- Switch back to the branch
main:git switch main- Switches to the branchmain.git status- Indicates that you are nowOn branch mainagain.cat mars.txt- Shows that the content ofmars.txtis back to the content of the fourth commit.
- Edit the file
mars.txtand commit the changes:- If you have still opened
mars.txtin your editor, please double-check that it shows the right content. If in doubt, please close the editor and reopen the file. - Add the following line:
Generating solar energy is less effective on Mars - Please make sure that you added a closing blank line and saved the file properly.
git add mars.txt- Add the changes to the staging area.git commit -m "Add information about energy generation"- Records the change in the version history. The command output indicates that you performed the commit on branchmain.
- If you have still opened
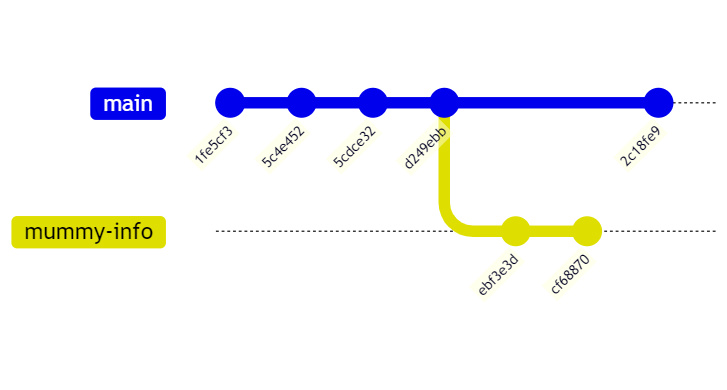
git graph indicates a split in the commit history because there are two different commits which are based on the same parent commit:

Merge the feature branch
Now, we want to integrate our work back into the main branch.
There are several ways to do this.
In this episode, we use the standard way via git merge which preserves the branching structure.
- First, you have to switch to the branch which receives the changes of the other branch.
In our example, we want to integrate the changes of the
mummy-infobranch into themainbranch. For that reason, we have to switch to themainbranch. Luckily, we are already on the right branch! - Next, we have to perform the actual merge operation:
git merge mummy-info- Starts the merge process and shows the current result.- Git tried to automatically merge the changes of
mars.txtfrom both branches. But it failed because both file versions contain a different line 4. - For that reason, we have to resolve the conflict manually. Without the conflict, we would be already done.
Let us resolve the merge conflict:
git status- Indicates that you are still in the merge process and thatmars.txtcontains conflicts.- Open the file
mars.txtin your editor and resolve the conflict manually:mars.txtshould look similar to the following:- Conflict markers
<<<<<<< HEAD ... ======= ... >>>>>>> <branch name>are used to indicate each conflict. - In our case:
- The first line could be merged without problems but line four could not.
- We have to resolve the conflict for the last line manually.
- We decide to keep both facts, remove the conflict markers and save our changes.
git add mars.txt- Tells Git that the conflict has been resolved.git commit- Opens the configured Git editor and shows a default merge commit message. In addition, you can see the resulting changes introduced by this commit. We use the default commit message and close the editor.
Configure another editor
- You can set the configuration option
core.editorto specify another editor that Git should use. - The A3.1 Appendix C: Git Commands - Setup and Config of the Pro Git book provides a comprehensive list of configuration commands for various editors.
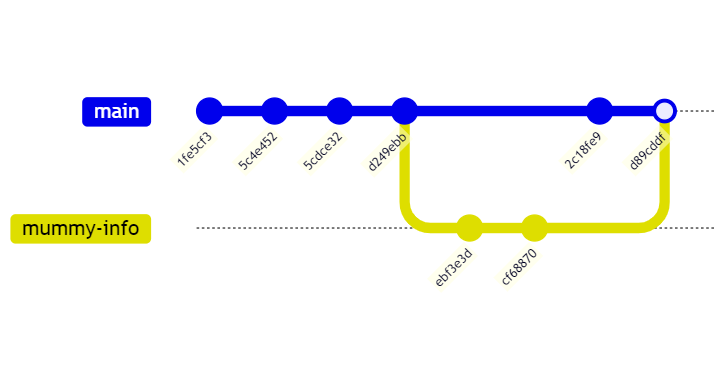
git graph shows that both branches have been merged:

The merge operation resulted in a so called merge commit:
- A merge commit is a commit with more than one predecessors. In our case, we have two.
- You can still identify the branch
mummy-infoincluding its two commits.
Finally, we want to clean up the feature branch:
git branch -d mummy-info- Removes the branchmummy-info. If Git found out that the branch has not been already merged, it would not perform the removal operation.git graph- Shows the same output but only the labelmummy-infois no longer there. However, the branch structure is still in place and a permanent part of the version history of themainbranch.
Key points
- Branching is an important concept in Git. Patterns such as the feature branch workflow provide guidance on how to use branches in a meaningful way. Please see Martin Fowler: Patterns for Managing Source Code Branches for more patterns.
- The feature branch workflow works as follows:
- Create the feature branch and switch to it:
git branch <feature branch name>andgit switch <feature branch name>. - Perform your task: Modify - Add - Commit
- Merge the feature branch into the main branch:
git switch <feature branch name>andgit merge <feature branch name>.
- Create the feature branch and switch to it:
- There can be conflicts when branches are merged.
The process of resolving a conflict is similar to the usual commit workflow:
- Modify: Resolve all conflicts.
- Add: Add all changes to the staging area via
git add. - Commit: Conclude the conflict resolution and the merge operation via
git commit.